Troubleshooting 404 Errors for LinkGenius Links
First of all, don’t panic! In the context of LinkGenius, this issue might arise after installation or when altering the Link Prefix in the settings if for some reason the permalink structure didn’t update accordingly. The good news is that resolving this problem is relatively straightforward. This article will guide you through the process using two simple methods.
Method 1: Refreshing Permalinks Settings
One common cause of 404 errors with links is a mismatch between the stored permalink structure and the actual links. Here’s how you can refresh your permalinks settings to ensure they align correctly:
Step 1: Log in to Your WordPress Admin Dashboard
- Open your web browser and navigate to your WordPress website.
- Log in to your admin dashboard using your credentials.
Step 2: Visit the Permalinks Settings Page
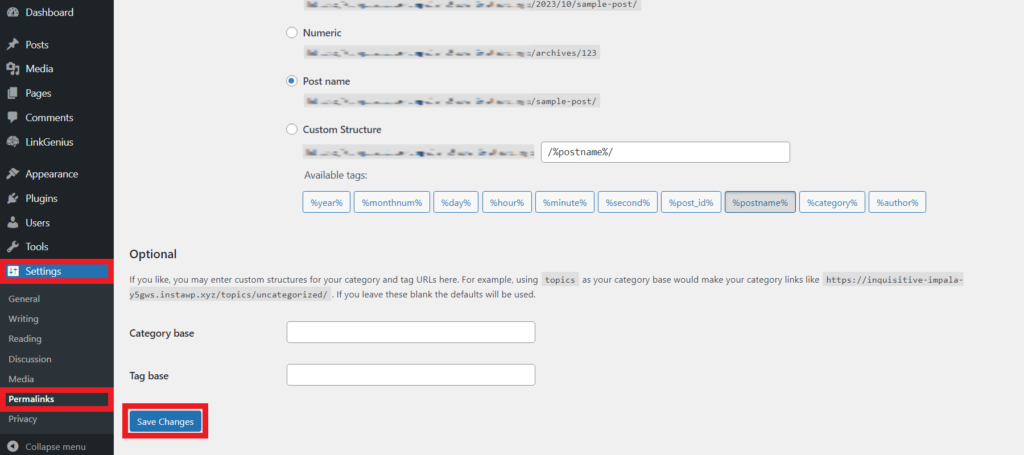
- In the WordPress admin menu, click on Settings and then select Permalinks.

Step 3: Simply Click “Save Changes”
- You don’t need to make any changes to the settings.
- Scroll down to the bottom of the Permalinks settings page.
- Click on the “Save Changes” button. WordPress will refresh your permalinks structure.
Step 4: Test the Links
- After saving the changes, test the links that were previously giving 404 errors.
- Check if the issue is resolved. Most of the time, this simple action rectifies the problem.
Method 2: Deactivating and Reactivating the Plugin
Another effective way to troubleshoot 404 errors related to LinkGenius is by deactivating and then reactivating the plugin. This process can reset the plugin’s configurations and resolve any conflicts that might be causing the issue:
Step 1: Log in to Your WordPress Admin Dashboard
- Open your web browser and navigate to your WordPress website.
- Log in to your admin dashboard using your credentials.
Step 2: Navigate to the Plugins Section
- In the WordPress admin menu, click on Plugins.
Step3: Deactivate LinkGenius
- Locate the LinkGenius plugin in the list of installed plugins.
- Click “Deactivate” below the LinkGenius plugin name.
- Once deactivated, the plugin’s features will be temporarily disabled.

Step 4: Reactivate LinkGenius
- After deactivating, click “Activate” to reactivate the LinkGenius plugin.
- The plugin will now be reinitialized with default settings.
Step 5: Test the Links
- After reactivation, test the links that were previously giving 404 errors.
- Check if the issue is resolved. Most of the time, this process resolves conflicts and restores proper link functionality.
By following these methods, you can effectively troubleshoot and resolve 404 errors associated with links on your WordPress website, especially in the context of LinkGenius. If the issue persists or if you encounter additional problems, it’s advisable to reach out to LinkGenius support for further assistance. Happy troubleshooting!
