
Creating a LinkGenius Link
Use this guide when you want to create a managed LinkGenius link in WordPress. A LinkGenius link lets you store the original destination URL in one place and then use a cleaner, managed URL across your posts, pages, reviews and comparison content.
This article focuses on the practical setup inside WordPress. If you are using affiliate links, also make sure your link attributes and disclosures match your own site policy and the rules of the affiliate program you joined.
Access the LinkGenius link editor
- Log in to your WordPress admin dashboard.
- Open LinkGenius from the WordPress admin menu.
- Click Add New to create a new managed link.
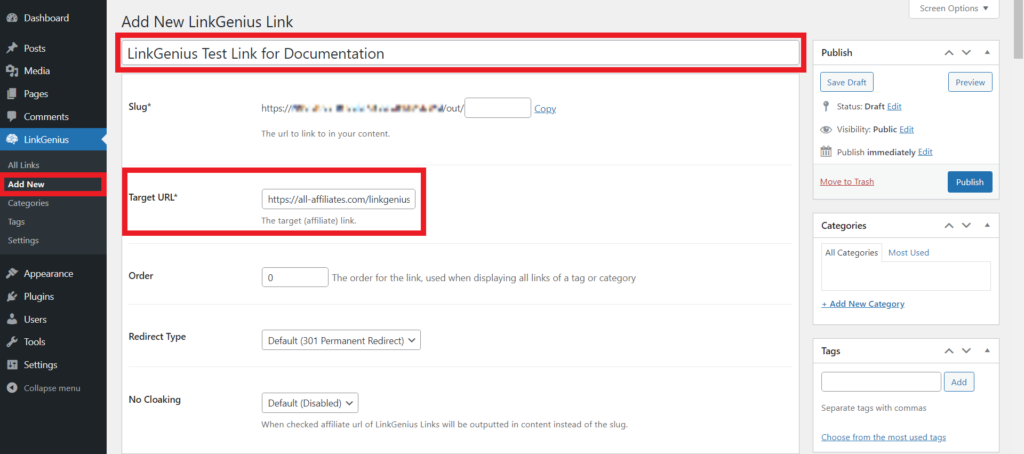
Fill in the basic link information
- Title: enter a clear internal name for the link. This helps you find the link later in your dashboard.
- Target URL: enter the destination URL. For affiliate links, this is usually the original tracking URL from the affiliate program or network.
Choose names that make sense months later. For example, instead of naming a link “homepage,” use something like “Example Store affiliate link” or “Example Store summer campaign.”
Choose a custom slug
The slug is the readable part of your managed link. If you leave the field empty, WordPress can generate a slug based on the title. You can also enter your own short, clear slug.
For example, if the link is for Example Store, you could use:
example-storeA clear slug makes the link easier to recognize and reuse. If you use branded or redirected affiliate links, check the rules of the affiliate program first.
Review the link options
LinkGenius includes additional options for how your link should behave. Depending on your setup, you can configure attributes such as opening the link in a new tab and adding link relationship attributes.
For affiliate links, rel="sponsored" is often relevant because it identifies a link as commercial or sponsored. LinkGenius can help you add this consistently, but it does not replace your responsibility to review your own affiliate disclosures, partner rules and site policies.
Save or publish the link
- Click Save Draft if you want to finish or review the link later.
- Click Publish when the link is ready to use on your site.
After publishing, the managed LinkGenius URL can be used in your WordPress content.
Use your LinkGenius link in content
After creating a LinkGenius link, you can use it in several ways across your website.
Method 1: Copy the managed URL
Copy the LinkGenius URL and add it as a normal link in a post, page, button, review or comparison table.

Method 2: Insert a link from the block editor
In the WordPress block editor, select the text you want to link and use the LinkGenius editor option when available. You can then search for the LinkGenius link by title or slug.

Method 3: Use a shortcode
LinkGenius also supports shortcodes. For example:
[linkgenius=link id="your-link-id"]You can find the link ID in the URL when editing the link. It is the number after the ?post= part of the edit URL.
Method 4: Use a LinkGenius block
LinkGenius provides blocks that help you place managed links directly inside the WordPress block editor. Search for the LinkGenius block when editing a post or page.
Example setup
Title:
Example Store affiliate link
Target URL:
Your original affiliate tracking URL
Slug:example-store
Rel attribute:sponsored, where relevant for your affiliate link
Disclosure:
Use your site’s affiliate disclosure workflow where required.
Next steps
Once your link is created, use it in your content and check it regularly. Central link management is useful when partner URLs change, campaigns end or you need to update the same affiliate destination across several posts.
Need to install the plugin first? Install LinkGenius on WordPress.org.